The Best Way to Make a Chicken Farm in Minecraft

Chickens are probably the most underrated mobs in Minecraft. They’re straightforward to kill, and usually, don’t have a lot fight worth. However, as soon as killed, they provide one of many sport’s finest meals sources and buying and selling gadgets. Consuming hen restores loads of your well being, and you may even use their feathers to commerce with villagers. Nevertheless, they’re solely dependable when you could have loads of them. That’s the place we’re stepping in that will help you discover ways to make a hen farm in Minecraft. With this farm, you will get dozens of cooked chickens and feathers routinely and very quickly. So, with out additional ado, let’s make an automated hen farm in Minecraft.
Make a Chicken Farm in Minecraft
The method of creating a hen farm, in itself, is comparatively straightforward. However you need to know all concerning the chickens, as a mob, first. For that, we’re initially masking the sport mechanics associated to chickens. Should you already learn about them, use the desk beneath to straight transfer to the farm constructing course of.
The best way to Get Chickens in Minecraft
The primary a part of a hen farm is, as you may anticipate, the chickens. You want at the very least two chickens to get your hen farm began. They mostly spawn in teams of 4 inside all biomes besides snowy and desert biomes. The simplest approach to discover this passive mob is by visiting villages.
In the identical village, it’s also possible to accumulate seeds by breaking crops and grass. Chickens are naturally drawn to seeds, and you should use these seeds to lure them to the realm the place you’re constructing your farm in Minecraft. Alternatively, it’s also possible to use result in pull them round. Since chickens can keep away from fall harm in Minecraft, you may even use Elytra to fly them round.
The best way to Breed Chickens in Minecraft
Each 5 to 10 minutes, chickens naturally lay eggs in Minecraft. These eggs don’t do something on their very own. But when the eggs are thrown, each egg has a 1/8 probability of spawning a child hen or a chick. Alternatively, when you manually breed two chickens, they may spawn a chick each single time. For the hen farm, we’re going to use each of those mechanics.
To breed a hen, you merely have to get two chickens shut to one another and feed them seeds. You should use wheat seeds, beetroot seeds, melon seeds, or pumpkin seeds. We recommend you go along with wheat seeds, as you will get plenty of them by breaking grass. As soon as a chick spawns, it’s important to wait for five minutes earlier than breeding the identical chickens once more.
Objects Required to Make a Hen Farm
You want the next gadgets to make a hen farm in Minecraft:
- Two Chickens
- Forty-4 Seeds (Any)
- One Carpet
- One Lava Bucket
- Two Hoppers
- Two Chests
- One Slab
- Two Dispensers
- Ten Constructing Blocks (any)
- Two Items of Redstone Mud
- Two Observers
- One Comparator
- Eight Glass blocks
Please observe that aside from the chests, not one of the blocks on this construct needs to be made out of wooden. Since we shall be utilizing lava on the farm, flammable picket blocks can put your entire construction in danger. Having stated that, all of the supplies you want for this farm are straightforward to gather in Minecraft. Due to that, you may create it early on in your survival world.
The best way to Make an Computerized Hen Farm in Minecraft
Although this farm’s design is now widespread locally, it was first created by the YouTuber Mysticat. Observe the steps beneath to make a hen farm in Minecraft:
1. First, put two chests on the bottom after which put a hopper behind a type of chests. This hopper needs to be dealing with the chest.
2. Then, put a constructing block behind that hopper with two dispensers on prime of that constructing block. These dispensers needs to be dealing with the hopper.
3. Then, put a slab on prime of the hopper. As soon as every part is in place, encompass the hopper with two-block excessive partitions of glass.
4. Now, put a hopper behind the underside dispenser and a bit of carpet on prime of that hopper. This hopper needs to be linked to the dispenser.
5. After that, place a constructing block on the bottom behind the brand new hopper. Then, put a comparator on prime of that block. The comparator’s two pins needs to be in the direction of the hopper.
6. Now, put an observer proper on prime of the comparator. You must make it possible for the observer’s facet with Redstone is dealing with upwards.
7. Lastly, place two glass blocks on both facet of the carpet to encompass it. Then, put a lava bucket within the prime dispenser.
The best way to Make the Hen Farm Work
With many of the farm’s construction prepared, it’s time so that you can do some further work. Observe these steps to complete your automated hen farm in Minecraft:
1. First, place one constructing block on every block across the carpeted hopper, i.e. on the glass blocks, dispenser, and observer. This can flip the carpeted space right into a cage from which chickens can’t get out. After that, it’s essential to make a brief staircase ranging from the bottom and main as much as the carpeted hopper.
2. Use seeds or result in make two chickens go up the staircase and drop on prime of the carpeted hopper.
3. As soon as each chickens are in place, it’s important to use seeds to breed them. We’d like a complete of 24 chickens on this enclosed area. Should you put greater than 24 chickens, the sport will begin killing them resulting from entity cramming.
4. After getting sufficient chickens, place an observer on prime of them. The arrow on prime of the observer’s face ought to face the chests. Then, take away all of the non permanent blocks.
5. Lastly, to automate the hen farm, place a bit of Redstone on prime of the observer that’s behind the newly positioned observer. Then, place one other piece of Redstone on prime of the dispenser that’s proper in entrance of the newly positioned observer.
How Does the Hen Farm Work
Now that your farm is prepared, it’s time to grasp the way it works. First, the chickens on prime of the carpet will lay eggs that get collected within the hopper beneath the carpet. Then, the hopper will ship the eggs into the dispenser, which can throw them till a chick comes out. After some time, the chick will develop and set off the observer making it unleash lava onto the chickens.
The lava will immediately kill the hen, making it drop feathers and cooked hen meals into the hopper beneath the slab. This loot from the hen is your reward you could simply accumulate from the chest. The very best half is that, after the preliminary breeding, you don’t must put any effort into the working of this farm.
The best way to Use Feathers in Minecraft
Cooked hen, as meals, is wonderful for therapeutic and restoring your starvation bar. Alternatively, the feathers collected by the hen farm in Minecraft can’t be used straight. As a substitute, you should use the feathers to:
- Create a firework star, e book & quill, and arrows.
- You should use the feathers to purchase emeralds from fletcher villagers. However normally, the price of emeralds is kind of excessive. So, it’s finest to first remedy a zombie villager to get higher buying and selling offers.
Ceaselessly Requested Questions
The best way to Creeper proof the hen farm?
To guard your hen farm from creepers, you may put a fence close to the farm and tie a cat to it. Cats in Minecraft are pure Creeper repellents and can maintain the Creepers away out of your farm.
How do you make a hen egg farm in Minecraft?
Should you solely need to accumulate eggs, you may exchange the dispenser, that throws eggs, with a chest. The chickens will proceed laying eggs however as an alternative of them getting thrown, the hopper will safely put them in a chest.
How do you make a giant hen coop in Minecraft?
To create a hen coop, first, take away the lava and assortment space from the farm. Then develop the spawn space of the hen. The remainder of the farm will work in the identical method however as an alternative of killing the chickens, it’ll begin accumulating them.
Tutorial To Make Computerized Hen Farm in Minecraft
With that, you are actually able to create your individual automated hen farm in Minecraft. It is without doubt one of the finest farms for newbies because it lets you perceive the sport’s breeding and farming mechanics on the identical time. Although, if you wish to take it a step additional, you may attempt constructing an Enderman farm in Minecraft. It is without doubt one of the most rewarding and effortful farms within the sport. Quite the opposite, for one thing simpler to construct, you may attempt to make a cow farm in Minecraft. It’s as straightforward as breeding chickens. Having stated that, what are you planning to gather out of your hen farm? Inform us within the feedback beneath.
The Best Way to Make an Iron Golem in Minecraft
Most mobs in Minecraft are both hostile or don’t react towards the gamers. However among the many bunch, there’s additionally Iron Golem, an entity that kills harmful creatures and protects gamers and villagers. In a method, it acts like the last word bodyguard within the recreation. So, all you could do is discover ways to make an iron golem in Minecraft, and you may let it maintain all of the in-game fight for you. It’s one among Minecraft’s most dependable methods to kill the Warden as properly. Having mentioned that, it’s time to study the very best methods to make an Iron Golem in Minecraft!
The way to Make an Iron Golem in Minecraft (2023)
We are going to first cowl the conduct and mechanics of Iron Golems on this blocky recreation. If you’re aware of them, use the desk under to skip to the crafting course of.
What’s an Iron Golem in Minecraft
The Iron Golem in Minecraft is a impartial mob that’s naturally confrontational in the direction of hostile mobs. It assaults virtually all harmful mobs it encounters, and due to its huge energy, the Iron Golem may even kill most of them with ease. By doing that, it protects all of the gamers and villagers in its neighborhood.
They’re one of many few mobs that spawn naturally and will also be created manually. It’s value noting that the Iron Golems that spawn naturally can kill gamers if they’re threatened. However, the manually created Iron Golems don’t ever assault gamers.
How Do Iron Golems Spawn
Naturally, Iron Golems spawn within the following areas:
- Pillager Outpost (trapped in cages)
- Villages (in open central areas)
Because of the Iron Golems’ spawning mechanics being intertwined with the villagers, you’ll be able to create preferable circumstances to spawn them manually. An Iron Golem can spawn naturally if the next circumstances are met:
- There are three or extra villagers within the space
- The villagers are gossiping or panicking a couple of hostile mob
- No different Iron Golem is current to guard them
- The world has a legitimate spot the place the Iron Golem can spawn
Gadgets You Must Make an Iron Golem
You want the next gadgets to make an Iron Golem in Minecraft:
- 4 Iron blocks (fabricated from 36 iron ingots)
- Carved Pumpkin or Jack o’Lantern
The way to Make Iron Ingots
To get an iron block, you need to mix 9 iron ingots on a crafting desk. So, you want a complete of 36 iron ingots to make 4 iron blocks that you simply want for creating an Iron Golem in Minecraft.
To gather the iron ingots, you’ll first should mine iron ores that spawn within the caves of the overworld. You should utilize our Minecraft 1.1 9 ore distribution information to simply discover iron very quickly. After amassing the uncooked iron from the ore block, you need to smelt it inside a furnace or a blast furnace to show it into iron ingots.
The way to Make a Carved Pumpkin
Comply with the steps under to make a carved pumpkin in Minecraft:
1. First, discover a pumpkin however don’t break it but. They mostly spawn in farms present in villages. If you’re making a number of iron golems, it’s greatest to create a simple Minecraft pumpkin farm first.
2. Then, use two iron ingots to craft a shear in Minecraft.
3. Lastly, use the shear on the pumpkin to show it right into a carved pumpkin. Now you can break the pumpkin to gather it.
Be aware: That is an optionally available step, however when you mix the carved pumpkin with a torch, it’ll flip right into a jack o’lantern. You may both use a carved pumpkin or a jack o’lantern to create an Iron Golem. The golem’s design and performance aren’t affected by the kind of pumpkin.
Minecraft Iron Golen: Crafting Recipe
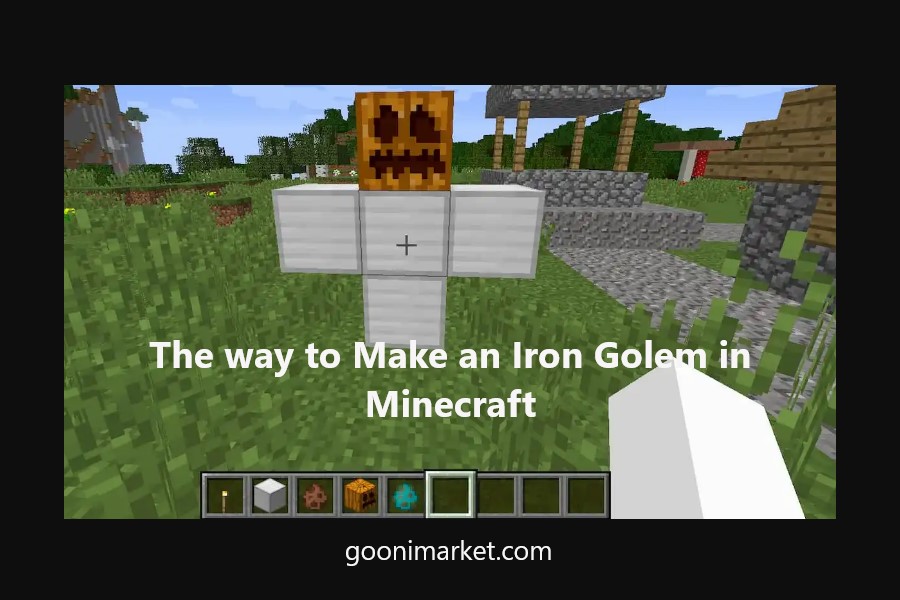
After you have all of the required gadgets, you could observe the under steps and assemble them to create an Iron Golem in Minecraft:
1. First, place two iron blocks on prime of each other to create a tiny tower-like construction.
2. Then, put two iron blocks on the alternative sides of the higher iron block to make a T form. Ensure you are creating this Iron Golem construction in an open space, or at the very least nothing is obstructing the positioned blocks.
3. Lastly, to complete creating the iron golem, place the carved pumpkin or jack o’lantern on prime of the construction. The construction will break, and a brand new iron golem will spawn instantly.
Within the Bedrock version, it’s also possible to use a daily pumpkin to craft the iron golem. Minecraft Java version solely means that you can use a carved pumpkin or jack o’lantern for its head.
Often Requested Questions
What is required to breed Iron Golems?
You may’t breed Iron Golems. However you may make them spawn manually utilizing villager mechanics. We have already got a tutorial to make an Iron Golem farm in Minecraft with these mechanics.
How do you tame an Iron Golem?
There isn’t any option to tame an Iron Golem in Minecraft. Although, it’s attainable to maintain them round by utilizing a lead and tying them to a fence.
Do Snow Golems shield you?
Much like Iron Golems, it’s also possible to make Snow Golems in Minecraft. They use snowballs to assault and kill hostile mobs.
Why is my Iron Golem not spawning?
Even with the right construction, an Iron Golem won’t spawn if there’s not sufficient open house round it. So, it’s greatest to create one with at the very least one block house on all sides, besides the underside.
Make Your Personal Minecraft Iron Golem Right now
Whether or not you want a bodyguard or a brand new good friend, now you may make an Iron Golem in Minecraft. Nevertheless it isn’t the one pleasant mob to assist you on this journey. It’s also possible to strive discovering villagers with totally different jobs who can give you a wide range of uncommon gadgets with nice commerce offers. Although, you’ll first have to discover and accumulate emeralds in Minecraft to take advantage of out of villager buying and selling. With that mentioned, how are you planning to make use of an Iron Golem in Minecraft? Inform us within the feedback under!
How to Make and Use the Eye of Ender in Minecraft

Whether or not you’re a newbie exploring Minecraft or a veteran speedrunning Minecraft seeds, the Eye of Ender is an inevitable merchandise to return throughout. However it doesn’t spawn naturally and neither does it behave like another merchandise within the recreation. That’s why it’s the reason for confusion for a number of Minecrafters. Fortunately, we’re right here to repair that by masking methods to make and use the Eye of Ender within the easiest way doable. However it requires a number of in-game touring, so let’s get began!
Eye of Ender in Minecraft: Defined
What’s the Eye of Ender in Minecraft?
The Eye of Ender is an unusual utility merchandise in Minecraft that doesn’t spawn naturally on the earth. It’s the major merchandise you’ll want to go to the Finish dimension in Minecraft, which is the place the Ender dragon resides. However you want objects from the overworld and the Nether dimensions to craft the Ender Eye. So, in a method, it’s the merchandise that connects all Minecraft dimensions with one another.
Gadgets Required to Make an Eye of Ender
You solely want the next objects to make an Eye of Ender in Minecraft:
- 1 Ender Pearl
- 1 Blaze Powder
- Crafting Desk (Optionally available)
We recommend you accumulate sufficient components for greater than 12 Eyes of Ender directly. Doing so will guarantee you may have sufficient of them to activate the Finish portal, even in the event you lose some on the way in which. This often occurs as a result of the Eye of Ender randomly breaks when thrown. As soon as it breaks, you possibly can’t get the Eye of Ender again. So it’s at all times good to have some additional Ender eyes for backup.
Ender Pearls
Ender pearls are simple to acquire in your Minecraft world. You will get them utilizing the next strategies:
- K*lling Endermen that spawn in all three dimensions of Minecraft
- Looting Chests in Woodland Mansions and Strongholds
- Buying and selling with expert-level cleric villagers (discover out about numerous Minecraft villager jobs right here)
- Bartering with Piglins within the Nether dimension
If you wish to take your Ender pearl assortment to the subsequent stage, we recommend you make an Enderman farm in Minecraft. It’s the excellent device to get an infinite provide of Ender pearls (and XP). Although, you solely want one Ender Pearl to make an Eye of Ender in Minecraft.
Blaze Powder
Comply with the steps under to get all of the blaze powder wanted to make the Eye of Ender in Minecraft:
1. First, make a Nether portal and journey to the Nether dimension.
2. Then, discover a Nether fortress, which is the place the Blaze mob spawns.
3. After discovering the fortress, roam round until you come across a Blaze. Then, k*ll it to acquire Blaze rods. Although, take into account that not each Blaze drops the rods, so that you might need to combat a couple of Blaze to get the rods.
4. Lastly, place the blaze rods within the crafting space to show them into blaze powder. You are able to do so utilizing crafting tables and even in your participant stock.
Minecraft Eye of Ender: Crafting Recipe
Upon getting the Blaze powder and Ender pearls in your stock, it’s time to create the Eye of Ender. You’ll be able to place each components wherever within the crafting space. We now have positioned the Eye of Ender and Blaze powder subsequent to one another to get an Eye of Ender. The recipe right here doesn’t comply with a strict order, and also you don’t even have to position them subsequent to one another if you’d like.
To not overlook, the crafting recipe of Eye of Ender is a two-item recipe. So, you possibly can even make it in your participant stock with out counting on the crafting desk.
Makes use of of the Eye of Ender in Minecraft
Ender Eye is the last word merchandise you’ll want to attain the Finish dimension and k*ll the Ender dragon, ending the sport’s important plot. Having mentioned that, an Eye of Ender has the next functions in Minecraft:
- Crafting Ender Chests
- Finding Stronghold
- Activating Finish Portal
Craft Ender Chests with Ender Eye
Utilizing Eye of Ender, you possibly can craft probably the most modern storage blocks in Minecraft. The Ender chest permits you to entry saved objects from any location with ease. Once you make an Ender chest in Minecraft, it’s linked to a person participant and can’t be seen by anybody else, so your treasures are safe.
Although we now have linked the information within the above paragraph, you need to know that you simply want Obsidian blocks and an Eye of Ender to craft the Ender chest.
Discover Stronghold with Eye of Ender
Comply with the steps under to make use of the Eye of Ender and discover Strongholds in your Minecraft world:
1. First, ensure you’re within the overworld dimension. Then, throw the Eye of Ender within the sky utilizing right-click or the secondary motion key. It would robotically fly 12 blocks towards the closest stronghold.
2. If the stronghold is much, the Eye of Ender will go upwards, and it’ll transfer downwards if the stronghold is close to. Furthermore, if the Ender Eye retains happening towards the identical spot, that’s the place your Stronghold is positioned. Now, you merely need to dig down.
Activate the Finish Portal in Minecraft
Upon getting discovered the stronghold, it’s time to place the Eyes of Ender as much as their important job:
1. First, discover the stronghold construction till you come throughout the portal room. It has the Finish portal floating on high of lava with a mob spawner subsequent to it.
2. Then, go to every of the Finish portal frames and use right-click or the secondary motion key to place the Eyes of Ender in them. As soon as all of the 12 Eyes of Ender are in place, the portal will get activated.
If you wish to go into the depth of discovering this construction we recommend you learn our devoted information to discovering the stronghold in Minecraft.
Make and Use Eye of Ender in Minecraft
Whether or not you have been struggling to seek out the Finish dimension or crafting an Eye of Ender, we hope our information has solved your queries. However earlier than you bounce into the portal, you should be ready to deal with one of many strongest mobs of Minecraft. For that, we recommend you carry a few of the finest Minecraft potions and a bunch of instruments backed by Minecraft enchantments for help with you. With that mentioned, which is your favourite dimension of Minecraft? Inform us within the feedback under!
The Best Way to Make Bundles in Minecraft 1.20

Think about roaming across the Minecraft world and discovering uncommon objects like diamonds solely to comprehend you haven’t any house in your stock to retailer them. Now, you may both depart them in a brief chest and hope they’re nonetheless there once you get again. Or, you may throw away different treasured objects to retailer even rarer ones. Neither of those conditions feels proper, although. Fortunately, quickly you gained’t need to compromise anymore. With the upcoming Minecraft 1.20 replace, the builders is likely to be trying so as to add the long-teased bundles to the sport. So you might want to discover ways to make bundles in Minecraft, and you’ll then increase your storage with ease.
The best way to Craft Bundles in Minecraft
What’s a Bundle in Minecraft
Bundles are an upcoming storage merchandise in Minecraft that permit you to save up house in your stock. They’re like storage pouches to hold small however worthwhile stuff with you. With each bundle in your stock, you’re going to get as much as sixty-four bundle storage cells or one stack storage slot. The bundle’s storage capability modifications relying on the merchandise you retailer in them. Let me clarify.
How Do Minecraft Bundles Work
A bundle expands your stock’s storage by including a number of stackable slots for stackable objects and a brand new single slot for non-stackable objects. Let’s perceive it by an instance.
- Non-Stackable Merchandise: For those who put a single non-stackable merchandise like a potion bottle, a weapon, and a device in a bundle, you may’t place the rest inside it.
- Stackable Merchandise: In Minecraft, a stack refers back to the amount of an merchandise which you can group collectively in the identical storage slot. Gadgets like constructing blocks might be stacked in a gaggle of 64. In the meantime, different objects like Ender pearls make a gaggle of 16 objects. So, you may place an entire stack of the identical merchandise in a bundle.
- Totally different Stackable Gadgets: For those who don’t put a complete stack of the identical merchandise in a bundle, it’s also possible to put completely different portions of distinct objects in it. They may take up house as per their stackability. Listed here are some examples that will help you perceive the way it works:
- For those who put 8 Ender pearls (that are stacked in a gaggle of 16), 50% of the bundle’s space is stuffed. Now, you may solely put 32 sticks (50% of the 64 stick stack) into that bundle.
- Secondly, when you’ve got a bunch of things, and all of them stack into teams of 64, then you may put a complete of 64 objects within the bundle. No matter what number of copies of that merchandise are in that bundle, every merchandise will rely as one.
- Lastly, if the bundle is storing a non-stackable merchandise like a pickaxe, it will possibly’t retailer another merchandise – stackable or not.
Allow Bundle Datapack in Java Version
To make bundles in Minecraft, you first must make it possible for they’re in your sport. Presently, bundles are solely part of an experimental Minecraft Java snapshot as a knowledge pack. Comply with the steps under to discover ways to allow it:
1. First, open Minecraft Launcher and allow snapshots within the Java version’s “Installations” tab.
2. Then, return to the “Play” tab of the launcher and choose the “Newest snapshot” from the variations dropdown listing. After that, click on the “Play” button to launch Minecraft.
3. As soon as the sport launches, click on on the “Single participant” button on the house display.
4. Then, click on the “Create New World” button situated on the backside of the world menu.
5. Throughout the world settings, set the mode to “artistic” to your ease, and click on on the “Information Packs” button.
6. Throughout the information packs part, click on on the “bundle” information pack to maneuver it to the “Chosen” space and activate it in your world. You’ll be able to activate the opposite information pack too in order for you different upcoming options like camels in Minecraft.
So now, your newly created world could have bundles enabled by default. Hold studying to discover ways to create bundles and use them in Minecraft.
Gadgets You Must Make a Bundle
You should acquire the next objects to craft a bundle in Minecraft:
- 6 Rabbit Hides
- 2 Strings
- Crafting Desk
Probably the most dependable solution to receive strings is by k*lling spiders and cave spiders that spawn in darkish areas. Alternatively, it’s also possible to k*ll striders and cats, as they generally drop strings. However if you happen to want to play passively, you may receive strings by breaking cobwebs that spawn in varied overworld areas.
In the meantime, rabbit disguise is mostly obtainable by k*lling rabbits that often spawn within the desert, snowy, and taiga biomes. To not neglect, it’s also possible to tame a cat in Minecraft, and if you’re actually fortunate, get a rabbit disguise as a present from the cat.
Minecraft Bundles: Crafting Recipe
Upon getting collected the objects, comply with these steps to craft a bundle in Minecraft:
1. First, place rabbit disguise in every cell of the bottommost row of the crafting space.
2. Then, place one string in every nook of the topmost row of the crafting space.
3. Lastly, apart from the center cell of the center row, fill all of the remaining cells with rabbit disguise. And with that, your bundle is now ready-for-use in Minecraft.
The best way to Use Bundles in Minecraft
Bundles don’t work like chests or the participant stock. It’s a must to use them as handbook objects. Comply with these steps to determine the way it works.
1. First, ensure you have an empty bundle in your stock. It’s represented by a bundle icon with an open mouth.
2. Now, left-click to carry that bundle inside the stock. It is going to then transfer round alongside your cursor.
3. Lastly, hover over the article you wish to put into the bundle after which right-click on it. The chosen objects can be saved in that bundle following the above-mentioned storage mechanics.
And if you wish to get the objects out, you merely want to choose up the bundle and right-click in empty slots. The merchandise that was picked final will come out first, following a stack order.
Make and Use Bundles in Minecraft 1.20
Minecraft’s storage and stock are lastly getting a much-awaited replace, and it’s higher than you may think about. The beforehand unveiled bundles are coming to the sport to alter your storage decisions without end. However they’re solely one of many many new upcoming options. It’s also possible to get camels in Minecraft to increase your sport’s mob choice with a brand new rideable animal. As for different objects, the devs have launched bamboo wooden in Minecraft to increase the merchandise library. Having stated that, how are you going to make use of bundles (storage pouches) in Minecraft? Inform us within the feedback under!
Methods to Make a Minecraft Villager Buying and selling Corridor

Minecraft is likely one of the most resource-focused sandbox video games on the market. It wants you to discover an virtually limitless world with the hopes of discovering helpful gadgets. Although, what if you happen to might purchase or alternate gadgets to get what you need with out leaving your base? That’s precisely what a villager buying and selling corridor presents. It’s the excellent grocery store various in Minecraft to handle your main wants. So, let’s work out how you can make a Minecraft villager buying and selling corridor and bid farewell to resource-hunting.
Create a Minecraft Villager Buying and selling Corridor
That can assist you take advantage of out of your Minecraft villager buying and selling area, we are going to first cowl the mechanics and fundamentals of villager buying and selling. Use the desk under to skip to the primary tutorial in case you are already conversant in the idea of buying and selling in Minecraft.
How Does Villager Buying and selling Work in Minecraft
Whereas many of the useful resource assortment in Minecraft relies on exploration, the sport additionally lets you acquire gadgets by way of villager buying and selling. If a participant approaches choose passive Minecraft mobs, they provide sure trades. Then, the gamers can alternate gadgets with villagers or buy them utilizing emeralds, the unofficial forex of Minecraft.
Furthermore, these trades, like the actual world, are considerably negotiable. Some villagers promote costly stuff whereas others may give you a greater deal on the identical merchandise. To not overlook, the gamers’ actions may also enhance or lower the worth of sure trades. Extra on that later. First, let’s discover the varied sorts of villagers in Minecraft.
Forms of Villagers in Minecraft
Whereas segregating villagers into sorts, we aren’t contemplating villagers from varied sorts of Minecraft villages. Regardless that they seem distinct, their variations are solely visible. As an alternative, we’re specializing in villagers holding a various sorts of jobs. Every job permits the villagers to supply distinctive commerce offers to the gamers. Some are higher, whereas others are usually not so good.
Minecraft’s villagers can have the next jobs:
- Armorer
- Butcher
- Cartographer
- Cleric
- Farmer
- Fisherman
- Fletcher
- Leatherworker
- Librarian
- Mason
- Stone
- Mason
- Shepherd
- Toolsmith
- Weaponsmith
- Wandering Dealer (not a villager job, however gives related trades)
If you wish to dig deeper, you need to use our devoted information to Minecraft villager jobs and discover out the whole lot every one in all them has to supply.
Methods to Breed Villagers in Minecraft
As you would possibly count on, we want a bunch of villagers to make the Minecraft villager buying and selling corridor viable. To collect them, you’ll be able to both raid a bunch of villages or just breed two villagers in Minecraft till you have got sufficient. If you wish to take the breeding route, you simply need to feed bread, carrots, potatoes, or beetroots to the villagers in a closed area with beds.
If in case you have sufficient assets, you’ll be able to even arrange a devoted villager breeding space in Minecraft. It might act as the proper backup for the buying and selling corridor if you happen to lose a villager to hostile mobs. As you’ll uncover later, at occasions, we would have to switch villagers to get higher buying and selling offers. So, having extra villagers at your disposal isn’t a nasty factor.
Methods to Change the Job of a Villager
The job of each villager in Minecraft is linked to job web site blocks. These are purposeful blocks which might be someway associated to a activity that’s related with a selected village job. For instance, a composter is a purposeful block that you need to use to create bone meal (fertilizer) in Minecraft. However it is usually the job web site block for farmer villagers within the recreation.
So, if you happen to break a composter the farmer villager is related to, that villager loses their job. Then, they wander round aimlessly till they arrive throughout one other job web site block. You should use this mechanic to vary villager jobs, i.e. by breaking or changing their job web site blocks.
Gadgets Required to Make Villager Buying and selling Corridor
You have to accumulate the next gadgets to make a villager buying and selling corridor in Minecraft:
- Open Space (ideally 15 blocks in width and size)
- 5 Sticky Pistons
- 5 Redstone Mud Items
- 5 Villagers
- 5 Jobsite Blocks
- 4 Deepslate Brick Stairs (non-obligatory)
- 7 Darkish Oak Trapdoors
- 10 Polished Deepslate Slabs
- 27 Deepslate Tile Slabs
- 5 Levers
- 3 Ladders
- 18 White Carpets (non-obligatory)
- 5 Merchandise Frames (non-obligatory)
- 2 Chests
- 1 Zombie
- 5 Splash Potions of Weak spot
- 5 Golden Apples
Please observe that every one the constructing blocks, together with stairs and slabs, ought to be made out of any wooden kind. Until you need the identical minimal aesthetics as our buying and selling corridor, be at liberty to switch the design to your liking.
Tutorial to Make a Minecraft Villager Buying and selling Corridor
To make it simpler to comply with, our tutorial has separate sections specializing in one a part of the buying and selling corridor without delay. Simply make sure that to comply with all of them in sequential order.
Villager Space
Let’s start by making a protected space for the villagers to remain and commerce from. Comply with these steps to create rooms for the villagers within the buying and selling corridor:
1. First, discover a massive open space (not less than 15 x 15 blocks) to arrange your buying and selling corridor.
2. Then, dig a number of 2 blocks lengthy and 5-block-deep pits. We propose you dig not less than 5 such pits at a 1-block distance from one another.
3. Subsequent, exchange one of many base blocks of the pit with a sticky piston dealing with upwards and put a chunk of Redstone mud on high of the opposite block.
4. After inserting the Redstone mud, put the varied job web site blocks on high of the mud in every cavity. You’ll be able to exchange the block as per your buying and selling necessities later.
Zombification Space
As defined in a later part, you need to use zombies to get higher commerce offers from villagers. However for that, we’ll first have to arrange a protected and controllable zombification space. Right here’s how to try this.
1. First, depart a one-block hole and dig a tunnel behind the sticky pistons. This tunnel ought to be 4 blocks deep. After digging it, you’ll be able to depart a staircase-like opening subsequent to it. We’re utilizing deepslate brick stairs for a similar.
2. Then, create a 2-block tall opening by breaking blocks within the tunnel in the direction of all of the villager rooms (sticky pistons).
3. Then, place a darkish oak trapdoor on the high half of every newly created opening. This trapdoor, when closed, ought to depart the sticky piston inaccessible to gamers and different mobs of comparable top.
4. Lastly, cowl the roof of the tunnel with deepslate slabs (or another stable blocks) and place two openable darkish oak trapdoors on the staircase.
5. Lastly, open all of the trapdoors (on room openings) and get zombies on this tunnel. The simplest approach to do it’s to make the zombie comply with you thru one entrance of the tunnel whilst you get out from a short lived second entrance.
Buying and selling Corridor
As soon as the zombie space is prepared, comply with the steps under to create the primary villager buying and selling corridor in Minecraft:
1. To start, create a brand new tunnel in the direction of the job web site blocks at a 1-block hole. This tunnel ought to be 4 blocks deep and two blocks extensive.
2. Then, create a 2-block tall opening in the direction of the job-site blocks within the new tunnel.
3. Now, it’s time to get the villagers of their chambers. We propose you push them into the pit or destroy all current job web site blocks inside a 64 blocks space. If there are not any different job web site blocks close by, the villagers will willingly soar into the pits with job web site blocks. When the villager is contained in the pit, make sure that to create a roof with deepslate tile slabs (or any stable blocks).
4. Lastly, place a lever subsequent to every of the job web site blocks. Activating it will push the villager up and permit them to commerce with you.
Enhance the Buying and selling Corridor
With the fundamental performance in place, it’s time to improve the primary buying and selling space. So, comply with these steps to brighten the buying and selling corridor and make it extra helpful:
1. First, cowl the empty area on high of villagers’ heads and place a torch on high of the job web site block. This can stop hostile mobs from spawning of their chambers.
2. Then, place an merchandise body on high of every chamber’s entrance and put an merchandise regarding the villager’s job. This can make it simple to establish them. You can even use this time to carpet the ground for aesthetics.
3. Subsequent, cowl the highest of the buying and selling space with deepslate tile slabs (or stable blocks). However make sure that to create an entrance utilizing ladders and a trapdoor.
4. Lastly, place a couple of chests within the buying and selling space to retailer your emeralds and different buying and selling items.
Methods to Zombify & Treatment a Villager
Comply with the steps within the part under to get one of the best commerce offers by way of the zombification of a villager. Right here’s the way it goes:
1. First, make sure that there’s a zombie within the tunnel behind the villagers. You may give an merchandise (like armor) to the zombie or use a nametag to keep away from it from disappearing.
2. Then, set your recreation issue to exhausting from the pause menu. All villagers, when attacked by zombies, flip into zombie villagers within the exhausting issue.
3. Lastly, flip off the levers to push the villagers down. Then, the zombies will assault them and switch the villagers into zombie villagers.
4. As soon as your villagers have been was zombie villagers, it’s time to treatment them to safe higher commerce offers. For that, you first have to throw a splash potion of weak spot on every of the zombie villagers.
5. Then, feed every of them a golden apple to show them again into common villagers. The zombie villager will begin shaking earlier than the transition occurs. In case you face any downside, use our devoted information to be taught how you can treatment zombie villagers in depth.
Methods to Exchange Villagers Trades
After some trades, it’s pure {that a} villager can develop into ineffective. So, you would possibly need to exchange its trades. Right here’s how you can do it with out harming your bargains.
1. The simplest approach to get new trades is to exchange the job web site block. You are able to do it by breaking and inserting it a number of occasions.
2. One other approach to get new trades is by changing the villager. However, k*lling a villager can hamper your total trades. So, you first want to show the villager right into a zombie after which k*ll it. Later, you’ll be able to open the highest of its chamber to get a brand new villager as a replacement.
Further Suggestions for Minecraft Villager Buying and selling Corridor
Congratulations on creating your individual Minecraft villager buying and selling corridor. Now, it’s time to be sure to get probably the most out of it. So, listed below are some extra ideas for higher villager buying and selling:
- Hero of the Village: In case you finish a pillager raid and defend the villagers, the sport offers you a “Hero of the Village” impact. This impact offers you considerably higher trades. Although, we propose you fully shut off your buying and selling corridor earlier than inviting a raid.
- Nitwits: Regardless that they’re uncommon, Minecraft has nitwit villagers who can’t get any jobs. So if you happen to encounter such a villager, it’s greatest to do away with them moderately than losing your time.
- Villages: To make it simpler to get assets and villagers, it’s greatest to make buying and selling halls close to villages. Although, make sure that to interrupt all job websites within the village to maintain your villagers in management. Furthermore, you need to use our record of one of the best Minecraft village seeds to avoid wasting time.
- Wandering Dealer: If you wish to diversify your buying and selling choices even additional, you’ll be able to look forward to a wandering dealer to spawn after which lure it in one of many chambers. This mob spawns across the participant after random intervals of time.
Make and Use a Minecraft Villager Buying and selling Corridor
Whether or not you need to exchange your ineffective gadgets or have a straightforward approach to accumulate vital components, the Minecraft villager buying and selling corridor is right here to assist. However, even with improbable trades, it’s nonetheless not automated. So in case you are seeking to safe good assets with out a lot effort, we propose you make among the greatest Minecraft farms. They let you collect assets with out even urgent a button. Having mentioned that, in keeping with you, which villager presents one of the best offers? Inform us within the feedback under!
Minecraft’s New and Outdated Default Skins: A Full Information
Think about leaping right into a Minecraft server solely to see a bunch of similar-looking gamers operating world wide. That chaotic picture has been the case for almost all of the lifespan of Minecraft. However not anymore. With 9 wonderful choices for Minecraft’s default skins, now you can set your self aside within the sport. However which possibility fits you finest? Or somewhat, which one do you have to use? Let’s determine it out!
Minecraft Default Skins Overview
We are going to go over every default pores and skin individually that can assist you determine which one fits your model probably the most. However our listing isn’t ranked in any approach, so use the desk under to discover all of the skins in-game.
Notice: Our information options skins from the official Minecraft weblog publish, together with official photos. Primarily based in your sport’s model, shaders, and graphics settings, the skins can seem barely completely different in-game.
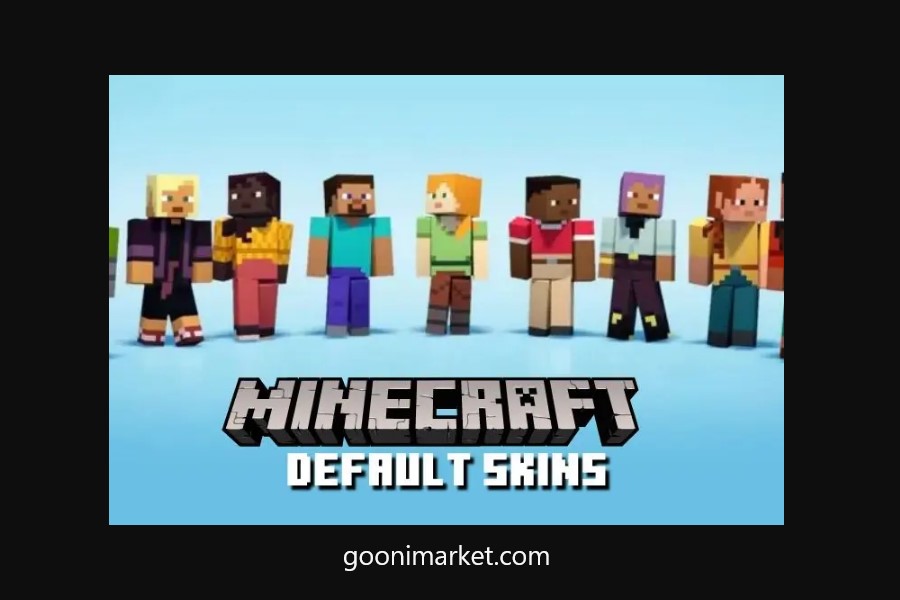
Full Checklist of Minecraft Default Skins
As of October 2022, Minecraft has a complete of 9 distinctive skins. Every pores and skin is numerous from the others by way of coiffure, style, and even pores and skin coloration. They’re a serious a part of Minecraft’s try and carry inclusiveness to the sport whereas making it extra fascinating to play with new mobs and biomes within the Minecraft 1.20 replace.
With that stated, right here’s an entire listing of all of the default skins in Minecraft:
- Steve (previous)
- Alex (previous)
- Noor
- Sunny
- Ari
- Zuri
- Makena
- Kai
- Efe
Apparently, apart from Alex and Steve, all the opposite default skins have been unveiled just lately on the Minecraft Stay 2022 occasion. The brand new default skins have been added to Minecraft greater than 10 years after the sport’s official launch. Nonetheless, the large assortment of the finest Minecraft customized skins has saved gamers coated until now.
1. Steve
Steve is the preferred default character pores and skin in Minecraft. He’s the primary character that was launched because the protagonist with the sport’s launch again in 2011. Steve wears a sky blue t-shirt and blue denims whereas rocking a sensible goatee. Even because the protagonist, Steve lacks an official backstory, permitting gamers to think about it as they need.
This open plot has led to loads of new characters originating from Steve. The preferred one is the Herobrine, who grew to become widespread as a meme within the early 2010s. Individuals believed that Herobrine, the evil clone of Steve, got here round and destroyed your builds whenever you weren’t trying. Most of the time, we nonetheless discover Herobrine followers in main Reddit communities, Minecraft Discord servers, and even our remark part.
2. Alex
Alex was launched to the sport in 2014 as a feminine equal to Steve. She rocks an orange ponytail, inexperienced eyes, and wears a light-green shirt alongside brown pants and lengthy grey boots. Just like the brand new skins, Alex’s introduction to the sport was an try and make it extra inclusive.
Because of their reputation, Alex has discovered her approach into different video video games, together with Tremendous Smash Bros Final and Minecraft Dungeons. On the time of her introduction, it was made clear that the sport will randomly assign the default pores and skin to gamers regardless of their gender or age. The identical randomly-assigned character system has continued since then.
3. Noor
From this level onward, our listing goes over all the brand new default skins added to Minecraft in October 2022. These skins purpose to make all gamers really feel welcome within the sport, regardless of their real-world background.
First up, we have now Noor, who has quick brown hair that matches their brown eyes. They put on a reddish jacket on prime of a black t-shirt that’s tucked in teal pants. To not overlook, “Noor” is the Urdu phrase for “gentle” and is a typical identify in households originating from Southeast Asia and Center Jap nations.
4. Sunny
Sunny has quick greyish black hair with matching deep black eyes. They put on sneakers and a inexperienced shirt with rolled-up sleeves. And to prime off the look, in addition they put on shoulder strap denims with one strap unhooked. To not overlook, from the seems to be of it, Sunny appears to have a gray prosthetic arm.
5. Ari
Regardless of the way you pronounce their identify, Ari has the cutest face amongst all of the default Minecraft skins. They’ve pinkish cheeks, a brown ponytail, and black eyes. Ari wears a yellow prime over blue denims and black sneakers. In addition they have a definite belt over their waist, which matches their hair.
6. Zuri
Zuri has a coiffure much like Sunny that includes quick black hair. They’ve a darker complexion and brown eyes, which completely match the brown belt that’s tied over Zuri’s khaki pants. Then, to degree up this delicate look, they put on a shiny purple t-shirt with a white collar and sleeve ends. Total, Zuri has probably the most delicate look in the whole group of Minecraft default skins.
7. Makena
Channeling a occurring vibe, Makena wears a yellow shirt that may simply mix in with the gold armor in Minecraft. They’ve darkish brown hair that falls over their shirt and options the identical coloration tone as their eyes. Matching the hair and eyes of default skins appears to be a pattern in these new skins. And nicely, Makena is unquestionably the chief in that. Lastly, to finish their look, they’ve mushy purple pants which can be curled over on the backside, permitting the brown and white sneaks to peak out.
8. Kai
Kai simply has probably the most distinct look within the crew. They’ve blonde hair and a beard that wrap round their head. These hair are tied up along with a purple rubberband on the again. The colour of their rubber band matches completely with their purple rob that has a block-like form on the again and lavender sleeve ends.
For the underside half, Kai wears darkish purple trousers and purple-white sneakers. To not overlook, in addition they have a purple band tied to their waist that’s subtly seen via the rob. At first look, Kai seems to be like somebody who is aware of the secrets and techniques of the Nether portal in Minecraft, which has the identical coloration scheme as Kai’s outfit.
9. Efe
If the number of choices makes it arduous so that you can select one, we recommend you go for Efe as your default Minecraft pores and skin. They simply have one of many most detailed appearances, providing royal vibes. Efe has a gold belt buckle, gold bracelet, gold earrings, and even a contact of gold of their sneakers. This golden style matches nicely with Efe’s whitish sea-green shirt and darkish purple pants.
In addition they have a smart-looking darkish purple bow tucked into their shirt. Efe’s purple hair and purple eyes match nicely with the remainder of their look. And the gold of their garments solely makes their model stand out extra.
Easy methods to Use Default Minecraft Skins
Whether or not you wish to use the default Minecraft skins or customized ones, the choice is available within the sport for the Bedrock version and within the Minecraft Launcher for the Java version. You should use our devoted information to study tips on how to set up Minecraft skins to profit from them with ease.
Full Checklist of Minecraft Default Skins
Similar to that, you at the moment are aware of the whole library of Minecraft’s default skins. Now, all that’s left so that you can do is equip them and make a reputation for your self in these survival Minecraft servers. Nonetheless, if you’re somebody who needs extra character customization, we recommend you check out these finest Minecraft lady skins. There are some actually distinctive choices in that information. With that out of the best way, which is your favourite default Minecraft pores and skin? Inform us within the feedback under!
The Right Way to Make a Chiseled Bookshelf Secret Door in Minecraft
It’s time to improve your Minecraft home as a result of secret doorways simply bought an replace. Now you can understand your spy film goals and create a hidden door that opens when you work together with books. And that’s all because of the brand new chiseled bookshelves which have been added in Minecraft 1.20. They’re a one-of-a-kind storage choice that additionally works with Redstone parts. However one gained’t be capable to recognize the chiseled bookshelf’s capabilities with out a prime instance. So, right here’s tips on how to make a chiseled bookshelf secret door in Minecraft.
Chiseled Bookshelf Secret Door in Minecraft (Information)
We’ll first go over the functioning and Redstone mechanics of the chiseled bookshelf. If you’re already acquainted with the identical, you should use the desk under to skip to the key door tutorial.
How Does a Chiseled Bookshelf in Minecraft Work
A chiseled bookshelf is a novel storage block in Minecraft the place you’ll be able to maintain your books, enchanted books, and ebook & quill. Not like chests, the chiseled bookshelf doesn’t have a devoted UI. As an alternative, you simply have to take a look at it and place the book-based merchandise on one in every of its six slots. Equally, you’ll be able to take your positioned merchandise again through the use of the secondary motion key on any slot of the chiseled bookshelf.
Furthermore, identical to different storage blocks, the chiseled bookshelves additionally ship Redstone alerts. However as an alternative of the variety of gadgets in it, the sign’s power for a chiseled bookshelf relies upon upon the slot you work together with.
Redstone Indicators from Every Guide Slot
The power of the Redstone sign emitted from the chiseled bookshelf modifications with each slot. The sign from the highest left slot (light-blue ebook) has the weakest power whereas the underside proper slot (dark-blue ebook) has the best power. As you may count on, the sign power will increase as you go from left to proper and prime to backside within the slots of a chiseled bookshelf.
The power of every sign determines how far it will probably journey in a Redstone circuit. You may witness the identical utilizing randomly crammed chiseled bookshelf and Redstone comparator machines, identical to the above screenshot. That is the mechanic we are going to use to construct a secret door with a chiseled bookshelf.
Gadgets Required to Make Chiseled Bookshelf Secret Door
You want the next gadgets to make a chiseled bookshelf secret door in Minecraft:
- 12 Chiseled Bookshelves
- 1 Comparator
- 8 Redstone Mud
- 1 Sticky Piston
You should utilize the linked guides to search out the crafting recipe and extra particulars about every of these things. All of them are frequent Redstone parts that you could acquire early in your recreation.
The right way to Make a Chiseled Bookshelf Secret Door in Minecraft
Protecting your ease in thoughts, we now have divided our tutorial into separate sections. Every of them focuses on a special facet of the key door mechanism to assist keep away from any errors.
Make the Primary Construction
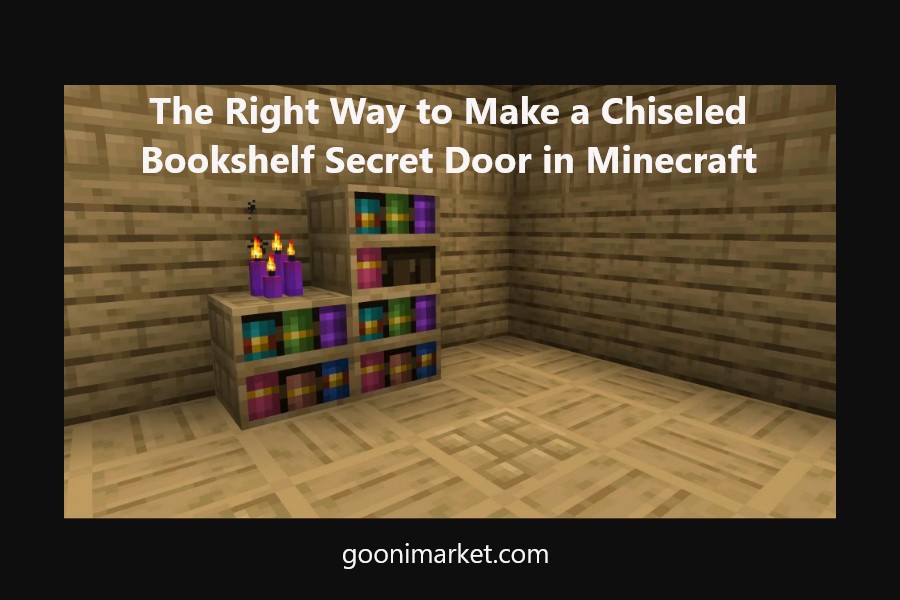
Comply with these steps to create the primary space of the chiseled bookshelf secret door in Minecraft:
1. First, dig a protracted tunnel within the floor, which is able to result in your secret room. Ensure that to safeguard its touchdown space utilizing both water or slime blocks.
2. Then, place a sticky piston one block away from the tunnel. This piston must be going through towards the tunnel, and there must be a block between the 2.
3. Then, create a row of chiseled bookshelves within the hole between the tunnel and the sticky piston.
4. We’re going for a principally crammed bookshelf secret door. So after inserting the chiseled bookshelves, fill them fully with bookish gadgets. Nonetheless, you’ll be able to go away a couple of slots empty to create confusion. However ensure that to go away the underside left chiseled bookshelf fully empty for now.
Redstone Mechanic for Secret Door
Comply with these steps to arrange the key door’s Redstone mechanics:
1. First, place a Redstone comparator behind the empty chiseled bookshelf. The comparator’s aspect with two pins must be in the direction of the chiseled bookshelf.
2. Then, place two items of Redstone mud adopted by a Redstone repeater subsequent to the comparator. The repeater’s moveable pin must be in the direction of the comparator.
3. Lastly, use Redstone mud to create a loop and join the Repeater to the sticky piston.
How Chiseled BookShelf Secret Door Works (Defined)
Mathematically, we are able to assign the next power values to every slot of the bookshelf (going L to R and T to B):
- Slot A: 2
- Slot B: 3
- Slot C: 4
- Slot D: 5
- Slot E: 6
- Slot F: 7
Every quantity signifies the quantity of Redstone mud that slot powers after touring by means of the comparator. Now, in order for you slot C to set off the sticky piston, you could place the Redstone repeater after three items of Redstone mud. While you achieve this, triggering slots A and B will do nothing. However, triggering slots C, D, E and F will activate the piston.
With that in thoughts, it’s all the time greatest to make use of the nook slots to activate or deactivate a secret door. In any other case, the invader could have multiple solution to set off the Redstone system.
The right way to Open and Shut Chiseled Bookshelf Secret Door
Comply with these steps to discover ways to use the key door:
1. First, go to the empty chiseled bookshelf and place a ebook within the prime left slot. This can instantly set off the Redstone mechanic and open the key door. Eradicating the ebook from that slot whereas the door is closed additionally triggers it.
2. Then refill the remainder of the chiseled bookshelf as per your preferences. Interacting with any of the opposite slots will shut the key door. Furthermore, whereas the door is closed, interacting with the opposite slots does nothing.
Observe: Whereas it will likely be attention-grabbing to create a secret door made out of the chiseled bookshelf, it’s, sadly, not potential to push it utilizing any piston. So, the chiseled bookshelf can solely act as a set off as an alternative of the key door.
Make a Chiseled Bookshelf Secret Door in Minecraft At this time
And identical to that, you are actually able to create your individual secret library door in Minecraft. Our model is simple sufficient to suit into virtually all sorts of Minecraft homes. However we’re extra excited to see the way you modify and create it in your artistic method. Who is aware of, your concept may make it into the greatest Minecraft maps sooner or later. Having stated that, how do you assume the chiseled bookshelves will be improved? Share your ideas within the feedback under!
Methods to Craft and Use Hanging Indicators in Minecraft 1.20

Since their addition to Minecraft, indicators have been some of the helpful however annoying options of the sport. The latter half is generally as a result of their dependence on different blocks. You’ll be able to’t place the indicators with no block beneath them for help, which makes them fairly irritating to make use of in customized builds. However not anymore. Now, you solely have to learn to craft hanging indicators in Minecraft to bid farewell to all of your sign-related issues. Sounds too good to be true? Let’s discover out whether it is!
What Are Hanging Sings in Minecraft
Hanging indicators, because the title suggests, are placard-like picket boards you’ll be able to cling on the facet or beneath different blocks. They’re part of the Minecraft 1.20 replace, and earlier than their entry into the sport, you might solely place indicators on high of different blocks. The addition of hanging indicators opens up a bunch of inventive choices for the gamers. However their placement isn’t the one factor completely different from different indicators.
Minecraft Signal vs Hanging Signal: Variations
For these questioning, listed here are the variations between indicators (already within the recreation) and hanging indicators (study to craft in Snapshots beneath) in Minecraft:
| Options | Signal | Hanging Signal |
|---|---|---|
| Characters (in a single row) | 15 | 8 |
| Placement | Solely high | All sides and backside |
| Walkable | No | When positioned on the facet (with a rod on high) |
| Dimension | Smaller | Bigger |
| Economic system | Cheaper | Costly |
As you’ll be able to discover, the cuteness of hanging indicators comes at the price of practicality. Should you select the hanging signal, you’ll be able to’t put greater than 8 characters in a single row. And since they will simply stroll over them in some instances (described beneath), you’ll be able to’t use them in some Minecraft farms. To not neglect, the hanging indicators are additionally costlier to craft as a result of using iron chains within the recipe.
Gadgets Required to Make a Hanging Signal
With all that mentioned, you’ll be able to craft a dangling sign up Minecraft utilizing the next gadgets:
- Two iron chains
- Six stripped log blocks (any wooden)
You may get stripped logs by utilizing an axe on any wooden log. As a substitute of breaking the block, it’s a must to use the secondary motion key or right-click on the tree log to strip it. Make sure that all 4 stripped blocks are of the identical sort of wooden. To not neglect, if you wish to make a bamboo hanging signal, you first need to create a block of bamboo as they don’t spawn as logs naturally.
Methods to Make a Chain in Minecraft
The second essential ingredient within the crafting recipe of a dangling signal is an iron chain. Comply with these steps to craft a series in Minecraft:
1. First, mine iron ore blocks (use Minecraft 1.19 ore distribution information to seek out iron) and smelt them in a furnace or blast furnace. This can get you one iron ingot. We want two iron ingots to make one chain.
2. Subsequent, place one iron ingot anyplace on the crafting desk. Doing so will provide you with 9 iron nuggets.
3. Lastly, place an iron ingot within the center cell of the center row of the crafting space. Then, put one iron nugget within the high and one iron ingot within the backside cell of the center column. The center column will likely be fully stuffed, and your chain will likely be prepared. Repeat these steps to create a second chain to make a dangling sign up Minecraft.
Minecraft Hanging Signal: Crafting Recipe
After getting the stripped log blocks and chains, comply with these steps to make a dangling sign up Minecraft:
1. First, place one chain in every nook of the topmost row of the crafting space.
2. Then, fill the center and bottommost row of the crafting space with stripped logs or stripped bamboo. With that, Minecraft’s hanging signal is prepared for utilization. You get six hanging indicators utilizing this crafting recipe.
Methods to Use Hanging Indicators in Minecraft
When you efficiently craft a dangling sign up Minecraft, the following factor on the agenda is – easy methods to use it. So the place are you able to place the hanging indicators? Effectively, we’ll reply this query on this part.
1. First, equip the hanging signal you wish to use in your construct. Your character needs to be holding it of their hand.
2. Then, go subsequent to the block on which you wish to place the hanging signal. Keep in mind you could’t place it on high of different blocks; solely on the edges and beneath blocks.
3. If you discover the block on which you wish to place the hanging signal, use the right-click or secondary motion key to hold it. As soon as the hanging signal is in place, the sport will ask you to jot down textual content on it. To customise the textual content, you’ll be able to confer with our Minecraft shade and format codes information linked right here.
5. Lastly, as soon as you’re executed writing the textual content, the hanging signal will appear like this:
Sorts of Hanging Indicators in Minecraft
Sorts of Hanging Indicators: Based mostly on Wooden Shade
Based mostly on the wooden you utilize to craft this new merchandise, the colour of the hanging signal adjustments in Minecraft. Increasing on that, Minecraft has the next sorts of hanging indicators:
- Crimson
- Jungle
- Acacia
- Darkish Oak
- Bamboo
- Mangrove
- Warped
- Birch
- Spruce
- Oak
- Cherry
Sorts of Hanging Indicators: Based mostly on Placement
Based mostly on the way you place this merchandise, the hanging signal will be additional divided into three sorts:
- Beneath a Block: Should you place a dangling signal on the backside of a block, it hangs by way of the chains that’s connecting the 2.
- Hooked up to The Aspect: Should you place an indication on the facet of a block, it spawns with chains hooked up to sticks. Like different strong blocks, you’ll be able to stroll on high of this stick.
- Related to One other Signal: Should you place a dangling signal beneath one other hanging signal, they get linked with chains and type a bell-chime-like look.
- Floating Hanging Indicators: Should you break the block on the facet on which your hanging signal is positioned, the signal continues to drift within the air independently. At this level, we’re undecided if the independently floating hanging indicators are a bug or a function.
With the data to craft and use hanging indicators, you are actually able to customise your Minecraft home in an entire new manner. However earlier than you leap on the wagon, we propose you check out a number of the finest Minecraft texture packs. They will let you change your complete look of your world. Having mentioned that, which sort of wooden do you suppose makes the perfect hanging indicators? I’m an enormous fan of the brand new bamboo wooden. Share your opinions within the feedback beneath!
Find Out How to Make a Bamboo Raft in Minecraft 1.20

After the controversial chat report system, we didn’t count on Minecraft to current gamers with any main surprises this 12 months. However fortunately, we now have a completely surprising new car within the sport. Introduced on the Minecraft Stay 2022 occasion, rafts are actually part of the sport, and they’re able to out-compete the boats. So, let’s learn to make a raft in Minecraft and see how good they are surely.
Find out how to Make a Raft in Minecraft
What’s a Raft in Minecraft
In the actual world, a raft is a floatable construction that’s often made out of lengthy dried bamboo sticks. Minecraft’s iteration of the raft isn’t a lot completely different. It’s made utilizing bamboo blocks and floats similar to a ship within the waters of Minecraft. When it comes to look, the raft may be thought-about as a protracted piece of bamboo wooden with a shovel-like oar to row it round.
Two gamers, one participant and a mob, or two mobs can simply sit on a raft on the similar time. Aside from the boss mobs, it doesn’t matter what mob you’re attempting to suit onto it, the raft will seat them and let you transfer them round. We have been even in a position to get the Minecraft camels on a raft, but it surely clearly didn’t look as interesting as gamers using it.
Gadgets Required to Make a Raft
You solely want the next couple of things to craft a raft in Minecraft:
- 6 Bamboo Planks
- Crafting Desk
To create one bamboo plank, you might want to place a block of bamboo within the crafting space. Since every block offers out 2 planks, you will want 3 blocks of bamboo to get 6 planks. This crafting recipe is shapeless so you possibly can put the block of bamboo in any cell. As for the block of bamboo, you should utilize our devoted information to study methods to discover and use bamboo in Minecraft.
Minecraft Raft Crafting Recipe
The crafting recipe for the raft is the precise duplicate of the crafting recipe for a ship in Minecraft. Although, you can not craft the raft with different varieties of wooden. With that mentioned, observe the steps beneath to make a raft in Minecraft.
1. First, place one bamboo plank in every nook of the highest row within the crating space.
2. Subsequent, refill the center row of the crafting space with bamboo planks. You’ll be able to place the planks and create the identical sample utilizing the center and bottommost rows as effectively. The output might be a raft.
3. As soon as the raft is prepared, you possibly can select to mix it with a chest within the crafting space. You’ll now be capable to carry gadgets round with you in your voyage, however the raft will solely be capable to seat one participant.
Find out how to Use Raft in Minecraft
Since rafts are similar to boats, you possibly can push them into the water by strolling into them. Then, you might want to right-click or use the secondary motion key to experience it. As soon as you might be on the raft, you possibly can management and steer the raft with motion keys. If you don’t want to journey alone, you possibly can push a mob onto the raft to get them to experience within the again seat.
Boats vs Rafts: Which is Higher?
Regardless that they give the impression of being cool, the rafts don’t have any sensible benefit over the boats. Each of them have related speeds, the identical capacity to cut back fall injury, and even the very same crafting recipe. To not overlook, you possibly can even add chests to each of them. All of the variations between them are visible.
Boats are closed off by a small wood border on their edges, however the raft is open on all sides. Although, it doesn’t have an effect on the mobs’ capacity to get on them or assault you.
So, which one do you have to select in Minecraft – a ship or a raft? Properly, the reply to that depends in your private desire. In order for you quite a lot of colours and a conventional design, you possibly can go for the boat. In the meantime, the rafts are the way in which to go if you need one thing contemporary and completely different.
Make and Use a Raft in Minecraft In the present day
With that, you might be able to expertise much more lifelike survival islands in Minecraft. And to make your expertise worthwhile, we now have already compiled an inventory of the finest Minecraft survival island seeds. A few of them even develop with bamboo that you simply want in your raft. To not overlook, the rafts aren’t the one rideable entity within the new replace. You can even experience the camels in Minecraft and unlock a unique fight expertise. Having mentioned that, do you suppose rafts are good for Minecraft, or are they pointless? Inform us within the feedback beneath!
Hatch an Ender Dragon Egg in Minecraft
Preventing the Ender Dragon is an thrilling second for each Minecraft participant. However when you deliver it down, the keenness, for a lot of, appears to fade away from that time onwards. Despite the fact that the Warden in Minecraft is stronger than the dragon, the Historic Metropolis dweller simply can’t match its majestic look. Fortunately, Minecraft presents you an opportunity to recollect the fantastic Ender Dragon struggle with a devoted trophy for it within the type of an Ender dragon egg. This leads us to the fast query of tips on how to hatch an Ender dragon egg in Minecraft and whether it is even potential. Furthermore, can it enable you to respawn the Ender dragon, or is there one other root for reviving the boss mob? We’re right here to reply your entire queries. So let’s not wait one other second and study all the things it’s good to know concerning the dragon egg in Minecraft.
Hatch a Dragon Egg in Minecraft (2022)
Earlier than shifting on to speak about tips on how to discover and use the egg, we’ll first go over the fundamental mechanics of the dragon egg in Minecraft. Use the desk under to skip to the utilization tutorial in case you are already conversant in this merchandise.
What’s a Dragon Egg in Minecraft
The dragon egg is the rarest ornamental block in Minecraft and acts as a logo of your victory over the ultimate mob boss — Ender dragon. Gamers deal with it as a trophy merchandise as a result of the dragon egg solely spawns should you k*ll the dragon for the primary time on the Java version and the primary two occasions on the Bedrock version in any given world.
However please don’t confuse the dragon egg with the Ender dragon spawn egg. You can’t discover the latter in survival mode, nevertheless it permits you to instantly spawn the Ender dragon at will. The dragon egg is only ornamental, and you may’t use it for any useful objective. Fortunate for you, you don’t even want the Dragon egg to respawn the Ender dragon in Minecraft.
It has the identical iconic texture because the Endermen and the dragon itself. You’ll be able to place it on high of different blocks however not on their sides as eggs, like sand blocks, are affected by the sport’s gravity. So it requires a base block to be positioned upon. Although, in contrast to different falling blocks, the dragon egg can’t suffocate mobs by overlaying them.
Furthermore, like an Enderman, the dragon egg has the power to teleport to totally different spots when hit by the participant. It could teleport inside a 31 × 15 × 31 volumetric space if there’s an empty space (air block) round it. So it turns into difficult for gamers to interrupt and acquire it. However fear not, as a result of now we have all of it coated. Proceed studying to learn the way to get the Ender dragon egg with out making it disappear.
Get the Ender Dragon Egg
Now that you recognize what the aim of the egg is and the way it can act as an ornamental piece in your house, observe the steps under to seek out an Ender dragon egg in Minecraft:
1. First, discover a Stronghold in Minecraft and journey to the Finish dimension utilizing the Finish portal. It’s the one dimension the place the Ender Dragon and the dragon egg can spawn naturally.
2. Then, you need to defeat and k*ll the Ender dragon to spawn the dragon egg. A few of the greatest Minecraft potions will make the struggle a little bit simpler.
3. As soon as the Ender dragon dies, the dragon egg will spawn in the course of the principle Finish island. It is going to spawn on high of the portal construction that results in the overworld. Cowl the portal space with strong blocks to forestall the egg from by chance falling into it.
4. If you happen to break it by hand or use any instrument, the dragon egg will teleport to a brand new location. So, as an alternative of mining it, place a TNT subsequent to the egg and ignite it. Alternatively, you may place a piston subsequent to the egg and activate it utilizing a lever or a button to push the egg. Pushing or exploding the egg makes it drop itself as an merchandise.
Hatch a Dragon Egg in Minecraft
As talked about earlier, there is no such thing as a sensible strategy to “hatch” the Ender dragon in Minecraft, as there is no such thing as a child model of this mob. Nonetheless, when you preserve your egg as memorabilia, you need to use the in-game mechanics to simply spawn one other Ender dragon. K*lling the brand new dragon will get you a second dragon egg however solely within the Bedrock version. In the meantime, the Java gamers can simply respawn the dragon to relive the adventurous moments.
Gadgets You Have to Respawn the Ender Dragon
You want the next objects to make use of spawn the Ender dragon once more in Minecraft:
- 4 Finish Crystals
- 28 Glass Blocks (7 for every)
- 4 Eyes of Ender (1 for every)
- 4 Ghast Tears (1 for every)
- Crafting Desk
Craft Finish Crystals in Minecraft
To create an Finish crystal, you need to put an Eye of Ender in the course of the crafting desk. Then, place a ghast tear within the center cell of the bottommost row. Lastly, fill all of the remaining cells with glass blocks.
Steps to Hatch Dragon Egg in Minecraft
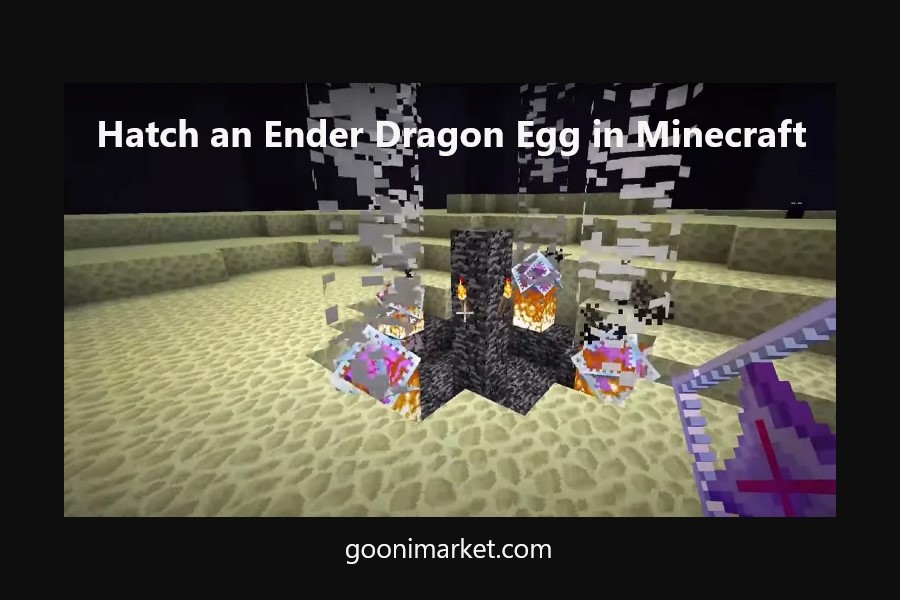
When you have collected all of the Finish crystals, it’s time to witness the second now we have been ready for. Observe these steps to learn to respawn an Ender dragon with or with out the Ender dragon egg in Minecraft:
1. First, return to the Finish dimension by the Stronghold in Minecraft. It’s the solely place the place the Ender Dragon can spawn.
2. Subsequent, surround the principle construction with Finish crystals. To do this, place one finish crystal within the center of every row of Bedrock blocks across the portal.
4. As quickly as you place the fourth crystal, the Finish crystal will restore the damaged crystals that spawn on high of the obsidian towers. As soon as all of the crystals are again, the crystals across the portal and the portal itself will disappear. Now, you need to k*ll the brand new Ender dragon to reopen the portal and return to the overworld.
Different Methods to Spawn Ender Dragon
Create a New World
If you happen to don’t need to danger shedding your sources, you may create a brand new Minecraft world to satisfy the Ender dragon once more. Each Minecraft world has its personal Ender dragon you could struggle with out placing your different worlds in danger.
Spawn Ender Dragon with Instructions
The best strategy to spawn an Ender dragon in any dimension of Minecraft is through the use of instructions. You solely have to activate cheats in your world and use the next command to spawn the dragon at your present location:
/summon minecraft:ender_dragon ~ ~ ~
Ender Dragon Egg FAQs
Will the dragon egg despawn after spawning the brand new Ender dragon?
Whereas the dragon egg doesn’t despawn as soon as the Ender dragon spawns, it might nonetheless get destroyed by the dragon. So, it’s greatest to shortly choose it up and retailer it at a safer location earlier than getting concerned in the principle struggle. Because you don’t even want the egg to spawn the dragon, it’s pointless to danger it.
Command to acquire dragon egg
You should utilize the next command in a cheats-enabled world of Minecraft to get limitless dragon eggs:
/give @s minecraft:dragon_egg
Does the portal disappear when the dragon spawns once more?
As quickly because the Ender dragon spawns once more within the Finish dimension, the portal to the overworld disappears. Now, you need to both k*ll the dragon or get k*lled to return to the overworld.
Spawn Ender Dragon in Minecraft
With that, you at the moment are able to have one other spherical of battle with the Ender dragon in Minecraft 1.19 or earlier. However earlier than you accomplish that, be sure to have the greatest Minecraft enchantments backing you up. Most gamers go for the second struggle to acquire extra expertise orbs. When you have the identical intention, we advise you create a Sculk XP farm as an alternative. It is likely one of the most efficient methods to acquire expertise shortly in Minecraft. With that stated, do you suppose the Ender dragon is underpowered as the principle boss of Minecraft? Or is she ample for all the brand new gamers? Inform us within the feedback under!